简介
提到Sentinel,相信大家都知道联想到熔断、服务间流量控制等。
官网的话总结的很好:
Sentinel 可以简单的分为 Sentinel 核心库和 Dashboard。
我们说的资源,可以是任何东西,服务,服务里的方法,甚至是一段代码。使用 Sentinel 来进行资源保护,主要分为几个步骤:
- 定义资源
- 定义规则
- 检验规则是否生效
想了解Sentinel就绕不开Sph,SphU,SphO,CtSph等。我想有人会好奇这名字代表什么意思,
官方说了Sph是一个魔法名(magic name),原来指代信号量Semaphore,历史原因没法改。
U、O网上传闻代表Unit、Operation。
下面说下初始化和执行流程。
初始化
Sentinel初始化会调用InitExecutor.doInit()这个方法。进行如下初始化: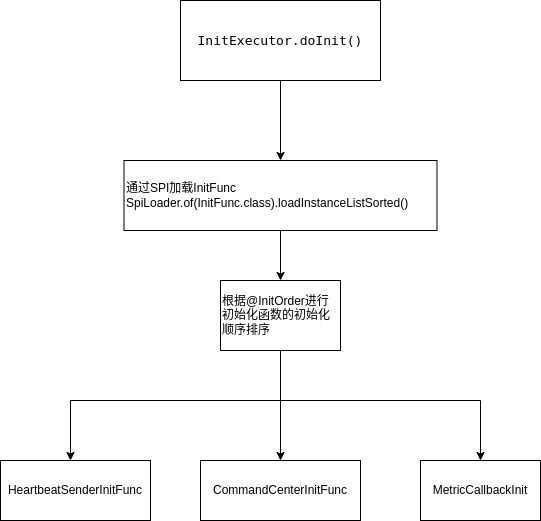
- 通过SPI加载InitFunc(Sentinel SPI类似Spring SPI,有兴趣可看下@SPI注解和SPILoader类)。
- 排序
- 调用InitFunc集合的init方法
我们看看这三个核心的InitFunc:
- CommandCenterInitFunc
- HeartbeatSenderInitFunc
- MetricCallbackInit
CommandCenter
CommandCenterInitFunc能够初始化CommandCenter。
CommandCenter可以理解为提供服务,我们可以通过这个服务接口和Sentinel core通讯,具体接口由CommandHandler提供。
The simple command center provides service to exchange information.
围绕CommandCenter有这些工具类:
- @CommandMapping
- CommandHandler
- CommandHandlerInterceptor
CommandCenter有:
- SimpleHttpCommandCenter 基于java ServerSocket的简单http实现
- NettyHttpCommandCenter netty实现
- SpringMvcHttpCommandCenter 基于Spring Boot的提供Spring MVC handlerMapping的实现。
简单说下常用的SimpleHttpCommandCenter实现:
- 启动单线程executor去执行server启动。
- bizExecutor是处理请求的executor。
- HttpEventTask读取HTTP报文,解析出CommandRequest,并执行CommandHandler。
- 返回数据。
HeartbeatSender
HeartbeatSenderInitFunc通过SPI初始化HeartbeatSender。
HeartbeatSender是维持Sentinel core和Sentinel dashboard心跳的组件。
    //通过SPI获取HeartbeatSender
    HeartbeatSender sender = HeartbeatSenderProvider.getHeartbeatSender();
    if (sender == null) {
        RecordLog.warn("[HeartbeatSenderInitFunc] WARN: No HeartbeatSender loaded");
        return;
    }
    //初始化定时任务器
    initSchedulerIfNeeded();
    //获取心跳发送周期 1. 配置 2. 获取不到则用HeartbeatSender的interval
    long interval = retrieveInterval(sender);
    setIntervalIfNotExists(interval);
    //启动心跳任务
    scheduleHeartbeatTask(sender, interval);
HeartbeatSender的实现有:
- SimpleHttpHeartbeatSender 基于java Socket的http实现
- HttpHeartbeatSender 使用netty http发送心跳
- SpringMvcHttpHeartbeatSender 使用httpclient发送心跳
MetricCallbackInit
MetricEntryCallback和MetricExitCallback通过MetricCallbackInit初始化。
public void init() throws Exception {
    StatisticSlotCallbackRegistry.addEntryCallback(MetricEntryCallback.class.getCanonicalName(),
        new MetricEntryCallback());
    StatisticSlotCallbackRegistry.addExitCallback(MetricExitCallback.class.getCanonicalName(),
        new MetricExitCallback());
}
我们可以通过StatisticSlotCallbackRegistry.addEntryCallback和addExitCallback,增加Sentinel规则监控。
也可通过定义AdvancedMetricExtension接口SPI实现类来做到增加Sentinel规则监控。
执行
我们知道Sentinel一般使用SphU.entry作为入口。Sentinel core主流程可简单描述为:
- 定义资源 (目前有两种string资源和Method资源)
- 定义规则(ProcessorSlot)
- 检验规则是否生效
Do all Rules checking about the resource.
Each distinct resource will use a ProcessorSlot to do rules checking. Same resource will use same ProcessorSlot globally.
SphU下面会执行如下语句:(Env.sph默认为CtSph。)
    //SphU
    Env.sph.entry(name, trafficType, batchCount, args)

    //CtSph
    public Entry entry(String name, EntryType type, int count, Object... args) throws BlockException {
        StringResourceWrapper resource = new StringResourceWrapper(name, type);
        return entry(resource, count, args);
    }
我们接下来看下CtSph的核心流程:
    private Entry entryWithPriority(ResourceWrapper resourceWrapper, int count, boolean prioritized, Object... args)
        throws BlockException {
        //1. 获取当前线程的上下文
        Context context = ContextUtil.getContext();

        //2. 如果超过了最大context数(2000),直接返回
        if (context instanceof NullContext) {
            // The {@link NullContext} indicates that the amount of context has exceeded the threshold,
            // so here init the entry only. No rule checking will be done.
            return new CtEntry(resourceWrapper, null, context);
        }

        //2. 如果是在最上层,初始化context
        if (context == null) {
            // Using default context.
            context = InternalContextUtil.internalEnter(Constants.CONTEXT_DEFAULT_NAME);
        }

        // Global switch is close, no rule checking will do.
        if (!Constants.ON) {
            return new CtEntry(resourceWrapper, null, context);
        }

        //3. 获取slot调用链,以资源维度生成chain
        ProcessorSlot<Object> chain = lookProcessChain(resourceWrapper);

        /*
         * Means amount of resources (slot chain) exceeds {@link Constants.MAX_SLOT_CHAIN_SIZE},
         * so no rule checking will be done.
         */
         //4. 如果超过了MAX_SLOT_CHAIN_SIZE(6000),则不执行rule检查
        if (chain == null) {
            return new CtEntry(resourceWrapper, null, context);
        }
        // 5. 生成entry类(入口)
        Entry e = new CtEntry(resourceWrapper, chain, context);
        try {
            //6. 执行slot链
            chain.entry(context, resourceWrapper, null, count, prioritized, args);
        } catch (BlockException e1) {
            // 规则检查,抛出sentiinel的block异常,调用exit做上下文处理和记录
            e.exit(count, args);
            throw e1;
        } catch (Throwable e1) {
            // This should not happen, unless there are errors existing in Sentinel internal.
            RecordLog.info("Sentinel unexpected exception", e1);
        }
        return e;
}上面是核心流程,我们重点分析slot流程和Context的结构。
Slot chain
引用官方文档的话,
在 Sentinel 里面,所有的资源都对应一个资源名称(resourceName),每次资源调用都会创建一个 Entry 对象。 Entry 可以通过对主流框架的适配自动创建,也可以通过注解的方式或调用 SphU API 显式创建。 Entry 创建的时候,同时也会创建一系列功能插槽(slot chain)。
slot chain是在上面第三步初始化的lookProcessChain(resourceWrapper);。
    //CtSph
    ProcessorSlot<Object> lookProcessChain(ResourceWrapper resourceWrapper) {
        ProcessorSlotChain chain = chainMap.get(resourceWrapper);
        if (chain == null) {
            synchronized (LOCK) {
                chain = chainMap.get(resourceWrapper);
                if (chain == null) {
                    // Entry size limit.
                    if (chainMap.size() >= Constants.MAX_SLOT_CHAIN_SIZE) {
                        return null;
                    }

                    chain = SlotChainProvider.newSlotChain();
                    //省略
                }
            }
        }
        return chain;
    }

    //SlotChainProvider
    slotChainBuilder = SpiLoader.of(SlotChainBuilder.class).loadFirstInstanceOrDefault();

    //DefaultSlotChainBuilder
    List<ProcessorSlot> sortedSlotList = SpiLoader.of(ProcessorSlot.class).loadInstanceListSorted();
说说初始化步骤:
- 通过单例方式初始化resource的ProcessorSlotChain。
- 通过SPI初始化SlotChainBuilder
- 通过SPI初始化ProcessorSlot集合
ProcessorSlotChain的结构是一个单向链表,默认的链表元素有(按执行顺序)(部分描述取自wiki):
- NodeSelectorSlot 负责收集资源的路径,并将这些资源的调用路径,以树状结构存储起来,用于根据调用路径来限流降级;
- ClusterBuilderSlot 则用于存储资源的统计信息以及调用者信息,例如该资源的
RT, QPS, thread count等等,这些信息将用作为多维度限流,降级的依据; - LogSlot 打印一些block日志
- StatisticSlot 用于记录、统计不同纬度的
runtime指标监控信息; - AuthoritySlot 黑白名单控制,以资源名为缓存维度,以origin(app)为控制维度。
- SystemSlot 用于系统负载限制,可以对总体的应用数据qps、thread、rt达到某阈值做block, 也可以对系统load、cpu用量达到某阈值做block。
- FlowSlot 限流策略实现,基于阈值类型、流控模式、效果(fail fast、warm up、queue wait)这几个维度去做控制。
- DegradeSlot 降级策略实现,有基于rt、异常比例、异常次数三种方式降级。
以上slot是执行流程。
数据结构在Context中进行解读。
Sentinel Context结构
我们先看这段例子代码的:
        // 配置规则.
        initFlowRules();

        ContextUtil.enter("entrance1", "appA");
        Entry nodeA = null;
        try {
            nodeA = SphU.entry("nodeA");
        } catch (BlockException e) {
            // 处理被流控的逻辑
            System.out.println("1 blocked!");
        }
        if (nodeA != null) {
            nodeA.exit();
        }
        ContextUtil.exit();

        ContextUtil.enter("entrance2", "appB");
        try {
            nodeA = SphU.entry("nodeB");
        } catch (BlockException e) {
            // 处理被流控的逻辑
            System.out.println("node b blocked!");
        }
        if (nodeA != null) {
            nodeA.exit();
        }
        ContextUtil.exit();

        ContextUtil.enter("entrance2", "appA");
        try {
            nodeA = SphU.entry("nodeA");
        } catch (BlockException e) {
            // 处理被流控的逻辑
            System.out.println("nodeA 2 blocked!");
        }
        if (nodeA != null) {
            nodeA.exit();
        }
        ContextUtil.exit();


        try {
            nodeA = SphU.entry("nodeC");
        } catch (BlockException e) {
            // 处理被流控的逻辑
            System.out.println("nodeC blocked!");
        }
        if (nodeA != null) {
            nodeA.exit();
        }
这段代码执行时的整体数据依赖关系: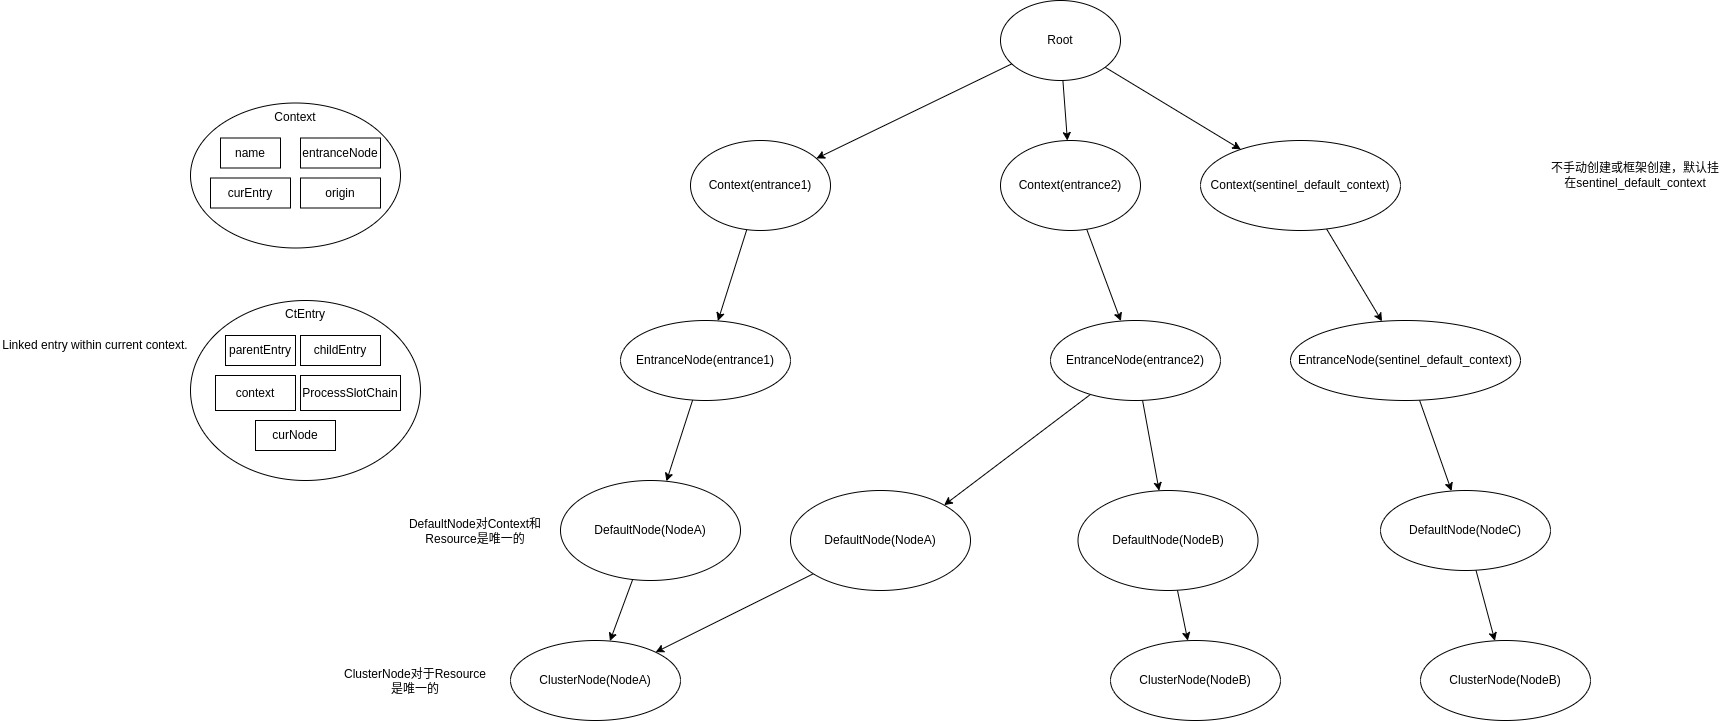
可看到Context的结构包含了:
- name
- entranceNode
- curEntry
- origin
CtEntry是当前Context中的一个链表结构,指代一个入口,包含:
- 父子entry
- context
- ProcessSlotChain
- curNode
StatisticNode和leapArray
按照Sentinel的文档来看,是基于时间窗口,其实现算法是leapArray。
统计的相关数据都用到node我们来看下Node的继承关系: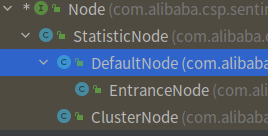
我们看到顶级父类是StatisticNode里面核心的属性是:rollingCounterInSecond和rollingCounterInMinute。其实现的数据结构就是LeapArray
LeapArray是基于时间窗口的实现,会把一段时间(intervalInMs)切分为取样个数(sampleCount)。
- int windowLengthInMs 单窗格的毫秒
- int sampleCount 取样个数
sampleCount = intervalInMs / windowLengthInMs - int intervalInMs 间隔时间(ms)
- double intervalInSecond 间隔的时间(s)
- AtomicReferenceArray
- ReentrantLock updateLock 插入和替换窗格的锁
数组里取样位的数据结构是MetricBucket,MetricBucket存储以下几种类型的计数:
- PASS
- BLOCK
- EXCEPTION
- SUCCESS
- RT
Response Time。 - OCCUPIED_PASS
结构整理如下: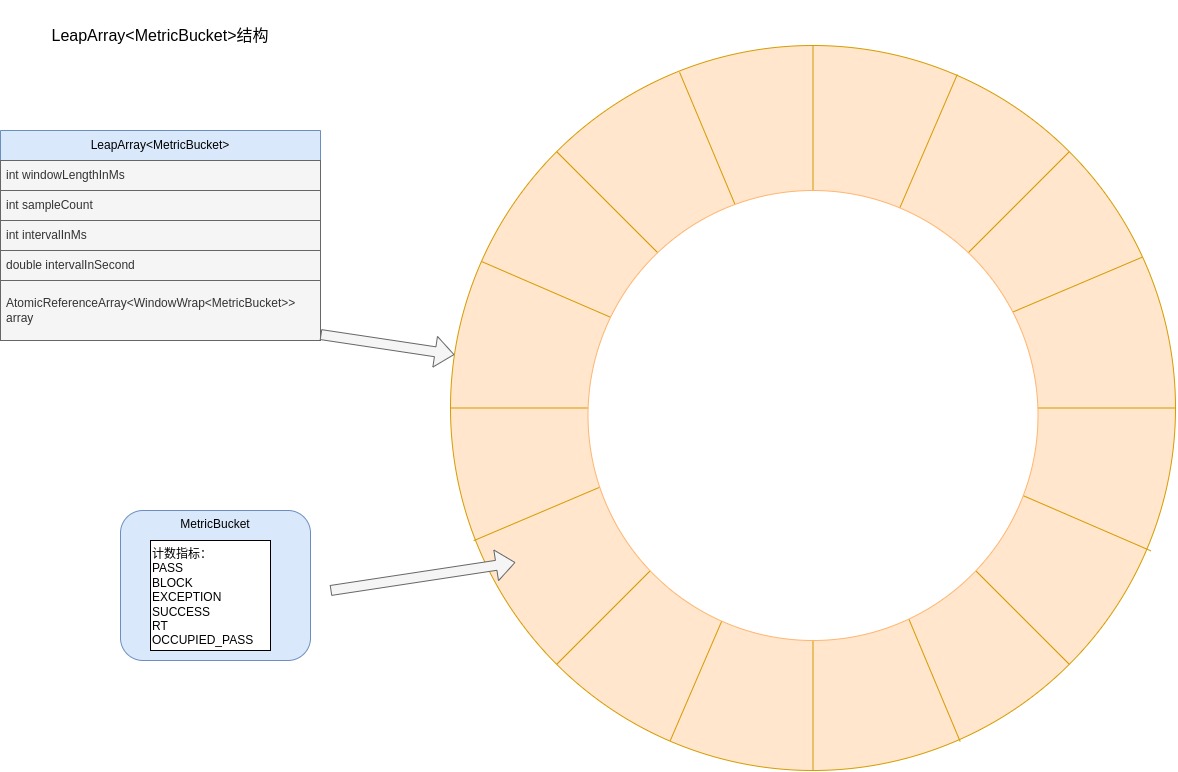
分析下leapArray的核心方法:
    // 用 当前时间 根据 窗格时长 计算出当前时间的滑动窗口的 数组下标
    private int calculateTimeIdx(/*@Valid*/ long timeMillis) {
        long timeId = timeMillis / windowLengthInMs;
        return (int) (timeId % array.length());
    }

    // 用 当前时间 根据 窗格时长 计算出当前滑动窗口的 开始时间 例如:12 - 12%2 = 10
    protected long calculateWindowStart(/*@Valid*/ long timeMillis) {
        return timeMillis - timeMillis % windowLengthInMs;
    }


    public WindowWrap<T> currentWindow(long timeMillis) {
        if (timeMillis < 0) {
            return null;
        }

        //窗口滑动方法 计算窗格下标
        int idx = calculateTimeIdx(timeMillis);
        //窗口滑动方法 计算当前窗格bucket
        long windowStart = calculateWindowStart(timeMillis);


        /*
         * Get bucket item at given time from the array.
         *
         * (1) Bucket is absent, then just create a new bucket and CAS update to circular array.
         * (2) Bucket is up-to-date, then just return the bucket.
         * (3) Bucket is deprecated, then reset current bucket.
         1. bucket不存在,则创建一个新并CAS更新。
         2. bucket是当前最新的,返回。
         3. bucket是过时并应该弃用,加锁并重置当前bucket.
         4. windowStart<窗口开始时间,意味着输入的时间超过了intervalInMs,是错误的输入,理论上不应该输入。
         */
        while (true) {
            WindowWrap<T> old = array.get(idx);
            if (old == null) {
                /*
                 *     B0       B1      B2    NULL      B4
                 * ||_______|_______|_______|_______|_______||___
                 * 200     400     600     800     1000    1200  timestamp
                 *                             ^
                 *                          time=888
                 *            bucket is empty, so create new and update
                 *
                 * If the old bucket is absent, then we create a new bucket at {@code windowStart},
                 * then try to update circular array via a CAS operation. Only one thread can
                 * succeed to update, while other threads yield its time slice.
                 */
                WindowWrap<T> window = new WindowWrap<T>(windowLengthInMs, windowStart, newEmptyBucket(timeMillis));
                if (array.compareAndSet(idx, null, window)) {
                    // Successfully updated, return the created bucket.
                    return window;
                } else {
                    // Contention failed, the thread will yield its time slice to wait for bucket available.
                    Thread.yield();
                }
            } else if (windowStart == old.windowStart()) {
                /*
                 *     B0       B1      B2     B3      B4
                 * ||_______|_______|_______|_______|_______||___
                 * 200     400     600     800     1000    1200  timestamp
                 *                             ^
                 *                          time=888
                 *            startTime of Bucket 3: 800, so it's up-to-date
                 *
                 * If current {@code windowStart} is equal to the start timestamp of old bucket,
                 * that means the time is within the bucket, so directly return the bucket.
                 */
                return old;
            } else if (windowStart > old.windowStart()) {
                /*
                 *   (old)
                 *             B0       B1      B2    NULL      B4
                 * |_______||_______|_______|_______|_______|_______||___
                 * ...    1200     1400    1600    1800    2000    2200  timestamp
                 *                              ^
                 *                           time=1676
                 *          startTime of Bucket 2: 400, deprecated, should be reset
                 *
                 * If the start timestamp of old bucket is behind provided time, that means
                 * the bucket is deprecated. We have to reset the bucket to current {@code windowStart}.
                 * Note that the reset and clean-up operations are hard to be atomic,
                 * so we need a update lock to guarantee the correctness of bucket update.
                 *
                 * The update lock is conditional (tiny scope) and will take effect only when
                 * bucket is deprecated, so in most cases it won't lead to performance loss.
                 */
                if (updateLock.tryLock()) {
                    try {
                        // Successfully get the update lock, now we reset the bucket.
                        return resetWindowTo(old, windowStart);
                    } finally {
                        updateLock.unlock();
                    }
                } else {
                    // Contention failed, the thread will yield its time slice to wait for bucket available.
                    Thread.yield();
                }
            } else if (windowStart < old.windowStart()) {
                // Should not go through here, as the provided time is already behind.
                return new WindowWrap<T>(windowLengthInMs, windowStart, newEmptyBucket(timeMillis));
            }
        }
    }
总结
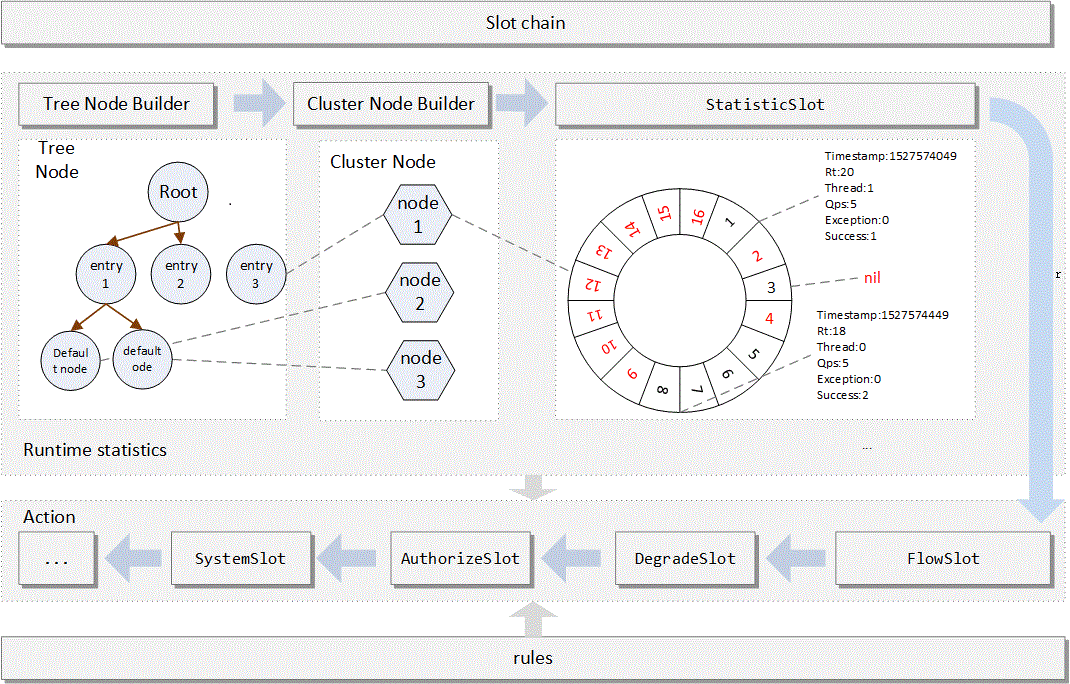
上图取自sentinel的wiki。
以前对Sentinel有一些源码的阅读和理解,不得不感叹看过的东西又再忘记了,这次让团队中一位小伙伴基于Sentinel开发一个组件,我再捡起来顺便记录下。 本节主要聚焦于初始化和核心执行流程(非异步侧)。对基础数据结构也做了分析。
重点分析了Sentinel core的初始化,ProcessSlotChain执行流程,Context和LeapArray。 Sentinel经历过很多公司的线上大流量验证,我们也能在其中看到一些历史,学到一些质朴的清晰的可拓展的代码设计流程。